
Table of Contents
Bowl turning techniques involve mounting a wood blank on the lathe, shaping the exterior with a tool rest and dovetail, hollowing the interior for spindle work, sharpening as necessary, and finishing for a well-balanced bowl.
Step-by-Step Guide to Turning a Wood Bowl
Prepare Wood
Before touching your lathe, prepare the wood. Select a blank that’s dry and free of cracks. Mount it securely on the lathe. Ensure balance to avoid uneven cuts.
I always check for imperfections in my blanks. This step avoids problems later on. After mounting the blank for turning wood bowls on the lathe, I spin it by hand to ensure it clears the tool rest and the bowl gouge can work effectively.
Turning Steps
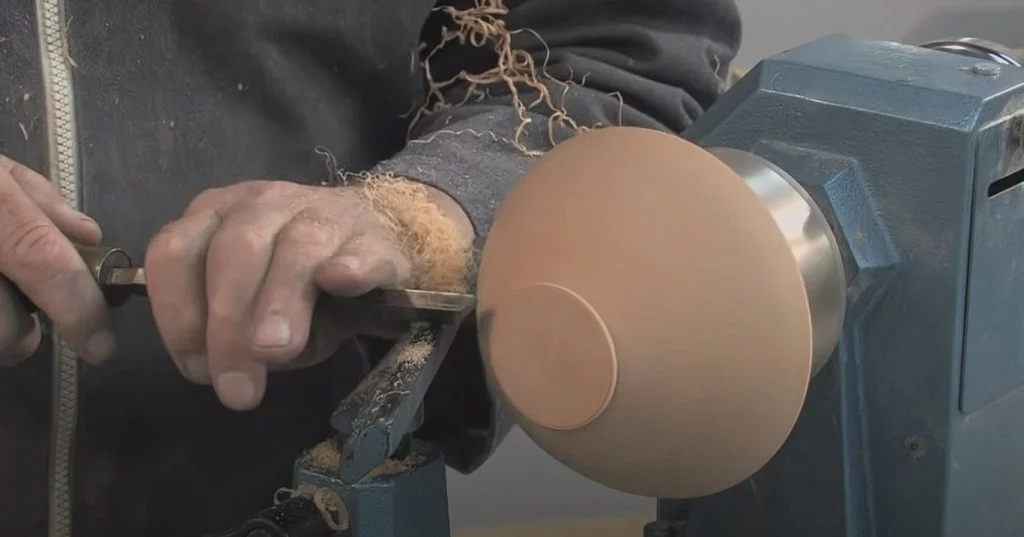
Now, begin shaping your bowl. Start roughing out the exterior of your turning wood bowls using a gouge chisel and lathe. Ensure your tool rest is adjusted correctly and your hand is steady. Use the lathe and bowl gouge to create the desired basic shape with smooth, controlled hand motions. Ensure your tool rest is adjusted correctly.
Once shaped, hollow out the interior carefully. I keep my gouge and other tools sharp for clean cuts when turning wood bowls by hand on the lathe; this reduces sanding later on.
Post-Turning
After turning your bowl gouge on the lathe, rest your hand on the tool rest. Then, sand your creation from coarse to fine grit for a smooth finish. Apply finish to the turning wood bowls while still mounted on the tool rest or after removing them by hand from the lathe using a bowl gouge, based on preference. In my experience, using a bowl gouge and tool rest when turning wood bowls finishing on-lathe gives me better control over even application by hand.
Shaping the Bowl Exterior and Interior
Exterior Appeal
Crafting the exterior of turning wood bowls on a lathe is about more than just making it look good; it involves precisely using a gouge and adequately positioning the tool rest.
Using the lathe requires skill to shape the outside edge of the bowl gouge with your hand, resting the tool on the tool sleep into something both pleasing to the eye and comfortable to hold. I always begin with a rough outline on the wood blank, using a lathe tool like a bowl gouge with a sharp angle to create smooth curves.
The trick in using the bowl gouge on your lathe to craft a wood bowl from a blank bowl lies in handling the tool; gentle, even pressure results in cleaner cuts.
The bowl rim plays a big part, too. The wood bowl, shaped from a bowl blank with a tool like a bowl gouge, should be even and well-defined, as it often catches the viewer’s first glance. A wood bowl with a rounded rim feels nice but can also add visual interest if contrasted with the sharper lines below. The bowl blank and bowl gouge are vital tools in achieving this design.
Interior Functionality
When shaping the inside of your wood bowl with a gouge tool, the functionality must come first, even before blank aesthetics. This means ensuring the bowl gouge tool provides enough depth for practical use of the wood bowl while maintaining the thickness of the bowl blank for strength. I carefully measure my tool’s depth cuts against my intended design to achieve the perfect wood bowl from a bowl blank.
An adequately shaped interior wall of a blank bowl crafted using a wood tool like a bowl gouge helps highlight woodworking craftsmanship while keeping usability intact. For instance, gently sloping the sides of a bowl blank allows easier access when using a bowl gouge or ladles without compromising the wood style.
The bottom of any wood bowl needs special attention – it’s not just about aesthetics but stability, too! Please don’t leave it blank; a gouge can help with this task. My approach involves using a gouge to create a slightly concave shape in the blank wood, which aids in stabilizing bowls on flat surfaces.
Sanding and Finishing Methods for Wood Bowls
Smooth Finish
Sanding is a vital step in bowl turning. It removes tool marks and prepares the surface. A smooth finish starts with proper sanding techniques. When carving a bowl blank from wood, I always begin with a coarse gouge and progress to finer ones. This ensures that all imperfections are addressed.
Wood bowls require attention to detail during sanding. Skipping grits can lead to scratches visible after finishing. Patience here makes a big difference in the final wood bowl blank, especially when using a gouge.
Choosing Finishes
There are many finishing methods for wood bowls. Each technique of gouging on a blank piece of wood can affect your bowl’s look, feel, and durability differently. The right choice depends on your design goals.
I prefer finishes like polyurethane or shellac-based products that withstand wear well for daily use items like a wood bowl blank. They protect the wood from moisture and stains effectively.
For decorative pieces, such as a bowl, blank, wax, or oil finishes might be enough. They enhance the natural beauty of the bowl blank without needing much protection against handling or moisture.
Basics of Wood Bowl Turning
Art and Science
Wood bowl turning is a craft that blends art with science, utilizing a tool rest, sharpening techniques, and a skew chisel as per an instructable. Craftsmen must understand the wood’s properties, using a dovetail and tool rest to shape it into a bowl through sharpening and sanding. They use tools like lathes, gouges, and chisels. Each tool leaves its mark on the wood. The grain pattern and hardness affect how each tool, like easy wood tools, works during wood turning, sharpening, and sanding.
I’ve learned that patience is vital in this process. Rushing can lead to mistakes or even injury. It’s essential to let the wood guide your hands.
Technique Matters
Using a tool rest and instructable for sanding, the proper technique can turn a simple piece of wood into an elegant bowl with a gouge bevel. Craftsmen develop their skills over time. They learn to position their tools for clean cuts and smooth finishes while sanding, woodturning, and creating a mortise.
In my experience, mastering these techniques takes practice. I remember my first attempts at wood turning; my initial bowls were rough around the edges—literally! The gouge cuts on the blank were far from perfect. But with time, they became more refined.
Trends in Turning
Wood bowl turning has evolved. New trends in wood turning emerge as craftsmen experiment with different cuts and styles. Methods such as turning wood bowls and adjusting the tool rest are gaining popularity.
- Some prefer traditional shapes.
- Others try bold, modern designs.
I enjoy blending old ways with new ideas in my wood-turning work on the lathe—it keeps sanding and other processes riveting!
Gear and Tools for Bowl-Turning
Essential Equipment
Crafting a bowl on a lathe requires specific tools. At the very least, it would be best if you had chisels, gouges, scrapers, and a tool rest for sanding. Be mindful of cuts when working with these tools, especially when creating a mortise. Each tool, whether for sanding, making mortise, executing cuts, or creating an angle, plays a vital role in shaping the wood. Chisels, resting on the tool rest, aid in sanding and making fine cuts for wood turning, smoothing out the angle and surface. Gouges, a type of mortise tool, are used to hollow out the wood on the tool rest to form the bowl’s interior. The cuts and angles are crucial in this process.
Scrapers, like the bowl gouge, refine the shape and remove any tool marks or rough cuts left by other tools, ensuring a smooth angle and sharp edge. Work, edge, angle, and cut improve your project’s polished finish. Without this essential equipment, such as the tool rest and mortise, turning an ordinary piece of wood into a functional and beautiful work would be much more complicated. Without them, even a simple cut would be significantly more challenging.
Quality Matters
I’ve discovered that high-quality gear like a lathe, gouge, and tool rest is critical for the triumphant turning of wood bowls. A good quality tool rest lasts longer and provides better control over your workpiece, leading to more precise cuts and fewer mistakes. This is especially true when working with a mortise or refining an edge by hand.
The difference between using bottom-tier work tools versus top-tier ones can be seen in both process efficiency and final product appearance, giving an edge to those who take the step to invest in quality. When turning wood bowls, investing in robust equipment like a tool rest pays off. This ensures that each work on the blank has clean lines and an even finish, demonstrating improved performance and durability.
Top Tips for Beginners
Fundamental Basics
Every beginner in wood bowl turning should grasp the fundamental principles, including proper use of the hand tool rest and understanding the importance of the bottom. It’s crucial to understand the role of each tool. The guide hand, tool rest, and tail stock are essential for stability and precision in bowl gouge cut and mortise. Start with simple projects to build confidence.
I’ve found that using a tool rest while working on softer woods with your hand on a lathe helps you get a feel for the process without as much resistance. Remember, wood turning with a lathe is an art that requires patience, practice, and the right tool rest. Work carefully when creating a mortise.
Avoiding Mistakes
Common mistakes can hinder progress for beginners. Rushing work or applying too much pressure on the hand tool rest often leads to errors in each step. Always ensure your right-hand turns wood bowls with sharp tools; dull bits make the mortise work harder and riskier.
In my early days working with a lathe, I learned that not all wood – or tool rests – are equal. Choosing the right type and using your hand correctly makes a big difference in the outcome of your project.
Proven Tips
There are proven tips to help fast-track your progress in bowl turning, specifically when working with wood bowls on a lathe using a tool rest.
- Use easy wood tools explicitly designed for beginners.
- Maintain a consistent speed on the lathe.
- Keep your eyes on the right path where you want your work to go, not just on the hand currently cutting at the tool rest.
Safety Measures and Personal Protective Equipment
Essential Gear
Safety is crucial when turning bowls. Craftsmen must wear safety glasses to protect their eyes from wood chips while using the tool rest and hand bowl gouge. A face shield adds another layer of defense.
Before starting any project, I always ensure my safety gear, tool rest, and work hand are within reach. Using the tool rest rightly, this hand work habit has saved me from many potential injuries over the years. The proper protection makes all the difference.
Sharpening Techniques for Turning Tools
Tool Maintenance
Keeping your tools sharp is not just important; it’s essential, especially when working with a blank wood bowl. Sharp tools make cleaner cuts and require less force. This means better control and safety when turning an empty wood bowl. Dull blades can cause uneven surfaces on a wood bowl blank, which takes more effort to sand.
Sharpening my tools before each wood bowl blank project ensures the best results. Choosing the suitable wood and setting up the lathe has become part of my routine, just like selecting the perfect bowl blank. A sharp tool makes turning a wooden bowl blank easier and more enjoyable.
Sharpening Frequency
The frequency at which you should sharpen depends on the use of the wood and the hardness of your bowl’s blank material. Generally, touch up your tools after every few hours of turning your wood bowl empty for optimal performance. Frequent light sharpenings of your wood bowl blank are better than waiting until they’re dull.
In my experience, paying attention to how the tool interacts with the bowl blank wood tells me when to sharpen again. If I feel resistance or see rough patches forming on the wood surface of the bowl, I know it’s time to stop and give my gouge or chisel some care.
Best Practices
Different turning tools require other techniques for effective sharpening, especially when working with a wood bowl blank.
- For a skew chisel working on a wood bowl blank, maintain a consistent angle against the grinding wheel.
- When working with a roughing gouge on a wood bowl blank, move it side-to-side across the tool rest.
- The spindle gouge needs careful rotation to keep its curved edge even, especially when working with a bowl made of wood.
Using jigs helps maintain proper angles while keeping fingers safe from harm when crafting a wood bowl—something I always prioritize in my workshop.
Remember that straight cuts on a bowl need proper steering; push cuts rely on precise lathe speed control and pressure application—all requiring well-maintained edges on your bowl-cutting instruments.
Showcasing Craftsmanship in Bowl-Turning
Unique Style
Crafting wood bowls is an art that showcases a woodworker’s skill and style. Craftsmen must infuse their work, like a unique bowl, with distinctive touches to stand out. This might involve experimenting with different shapes or incorporating intricate patterns into the design of each bowl. When I turn bowls on my lathe, I focus on creating smooth curves that please the eye and invite touch.
Consistency is vital when developing a signature style. Each bowl should reflect similar levels of quality and detail, ensuring buyers recognize your work instantly. A well-turned bowl has even walls and a pleasing shape, achieved through careful spindle work.
Creativity & Innovation
Innovation propels craftsmanship forward. Introducing new techniques or materials can set your bowl apart from others. For instance, using a dovetail jaw on the headstock spindle allows for more intricate designs, such as a bowl, without sacrificing stability during turning.
Creativity also comes into play with problem-solving during bowl projects. If I encounter an unexpected knot in the wood or need to correct an imbalance while working at the lathe bed to create a bowl, creative thinking helps me adapt quickly to maintain consistency in my finished pieces, including the bowl.
Conclusion and Pursuing Excellence in Wood Turning
Key Recap
We discussed how selecting the right tools, materials, and the appropriate bowl can make a significant difference. We also covered the importance of finishing your work to a high standard, much like a well-crafted bowl.
Crafting bowls requires patience and precision. The right speed and rest position are crucial. By applying these bowl-related techniques, you can create projects that stand out. Remember, every detail matters from start to finish.
Mastery Journey
The journey towards mastery in wood bowl turning is both challenging and rewarding. It takes continuous learning and dedication to perfect your craft, just like mastering the art of bowl-making. As a craftsman, I understand the satisfaction of creating something beautiful with my hands, like a bowl.
Experimenting with new ideas is essential. Don’t be afraid to try different finishes or designs. Sometimes, what begins as an experiment becomes a signature bowl in your collection.
Continuous Improvement
Improvement in woodturning comes from practice and perseverance. Always look for ways to enhance your skills. Attend workshops or watch tutorials from experienced turners.
My own experience, much like a bowl, has taught me that there’s always room for growth. Even after years of turning, I find new methods to improve my bowl work. This keeps my projects fresh and exciting.
In conclusion, bowl turning is an art that reflects the craftsman’s skill and creativity. Keep pushing boundaries and striving for excellence in each project you undertake, just like aiming for a perfect bowl. You can create a truly great bowl with every turn of the lathe.
Remember, your journey as a craftsman is unique. Embrace it with passion and patience, and you will achieve excellence in turning wood into a bowl.
Frequently Asked Questions
What are the essential tools needed for bowl turning?
You’ll need a lathe, bowl gouges, a parting tool, calipers, and a faceplate or chuck. These form the foundational toolkit for creating wood bowls.
Can beginners attempt bowl turning safely?
Absolutely. With proper guidance on technique and safety equipment like goggles and respirators, beginners can engage in bowl-turning safely.
What’s the first step in wood bowl turning?
Begin by securing your wood blank to the lathe using a faceplate or chuck before shaping it into a rough cylinder for your bowl.
How do I sharpen my bowl-turning tools effectively?
Use a bench grinder with an appropriate grinding wheel in a bowl; regularly hone edges with precision to maintain sharpness without overheating the metal in the bowl.
Is sanding important in the finishing of wood bowls?
Yes, sanding a bowl is vital as it smooths out imperfections and prepares the bowl’s surface for finishing treatments such as oils or lacquers.
What techniques showcase craftsmanship in turned bowls?
Incorporating unique design elements, precise tool control for clean cuts, and achieving fine finishes highlight expert craftsmanship in turned bowls.
How do I pursue excellence in woodturning beyond basic techniques?
Practice consistently, learn from experienced turners, experiment with advanced designs, and continuously refine your skills.