
Table of Contents
Crafting a wood-turned snowman involves selecting a suitable wood, like maple or basswood, for its workability and smooth finish. Start by mounting the pine wood on the lathe and shaping the body and head into rounded forms, typically with larger diameters for the base and smaller for the head. Sand the pieces while on the lathe for a smooth surface. Consider using different wood types or stains to add color or features and fit the bottom. Attach the parts using dowels or strong adhesive. Add details like arms, a nose, buttons, and a hat by turning smaller pieces or carving them. Finish with a durable sealant to protect the wood, especially if displaying the snowman outside. Throughout the process, prioritize safety, use sharp tools for cleaner cuts, refer to specific pattern guides or tutorials, and center the design.
Gathering Supplies for Wood Turning a Snowman
Essential Tools and Materials
To start wood-turning a snowman, you’ll need some essential tools and materials. First, gather a lathe, chisels, gouges, and sandpaper. These will be crucial in shaping the wood into your desired snowman form. Make sure to have safety equipment such as goggles, gloves, and a dust mask to protect yourself during the process.
When selecting the wood blanks for your project, opt for high-quality pine or any other type of wood that is easy to work with. The choice of wood is vital as it can affect your snowman’s overall appearance and durability. Look for smooth and knot-free pieces that will allow you to create clean cuts and details on your snowman’s body.
Personal tip: I ensure my chisels are sharp before starting any wood-turning project. This makes it easier to carve out precise shapes without putting too much strain on the tool or risking splintering the wood.
Safety Precautions
Before diving into wood turning, take some time to familiarize yourself with safety precautions. Always wear protective gear like goggles to shield your eyes from flying debris while working on the lathe. A dust mask is also essential in preventing inhalation of fine particles produced during sanding.
Remember not to wear loose clothing or jewelry that could get caught in the spinning lathe or tools – if you are not careful, this can lead to serious accidents! Also, always keep long hair tied back securely when operating woodworking machinery.
Choosing Decorative Elements
Apart from the basic supplies needed to create the wooden base of your snowman, remember to gather twigs for arms and a nose, along with sand to create texture on its surface later on!


Preparing the Blank for Your Snowman Project
Measuring and Marking
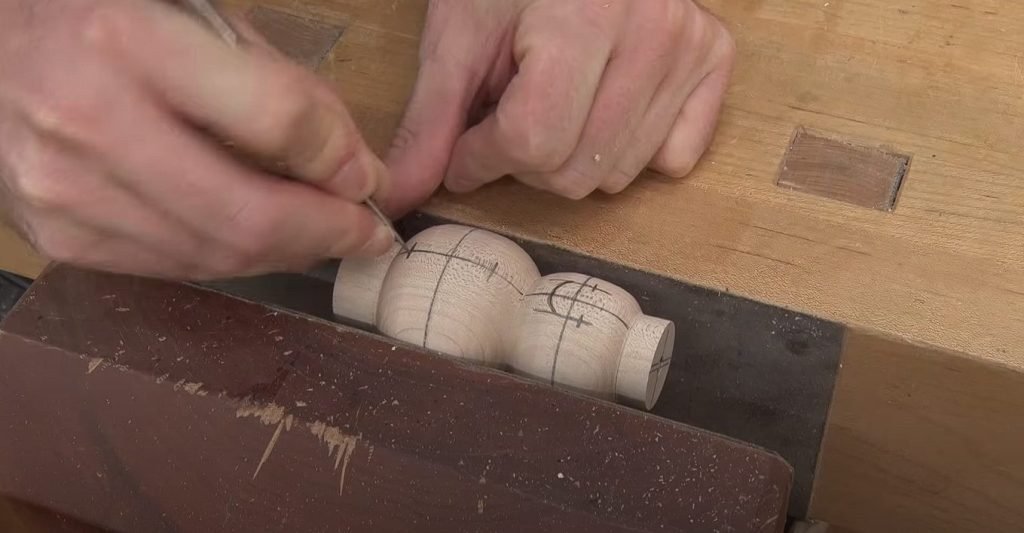
Before starting the wood-turning process, it is crucial to measure and mark the wood blank accurately. Use a ruler or measuring tape to determine the dimensions you want for your snowman project. Mark these measurements clearly with a pencil on the blank. For instance, if you want your snowman to be 8 inches tall, mark this height on the wood blank.
Once you’ve marked the measurements, consider dividing the blank into sections for different parts of the snowman, such as the head, body, and base. This will guide you during shaping and ensure that each part is proportionate to one another. It’s important to double-check your markings before moving on to ensure precision in shaping your snowman.
I find it helpful to visualize how I want my snowman to look at this stage – imagining where I’ll make cuts and shape each section helps me plan my marking more effectively.
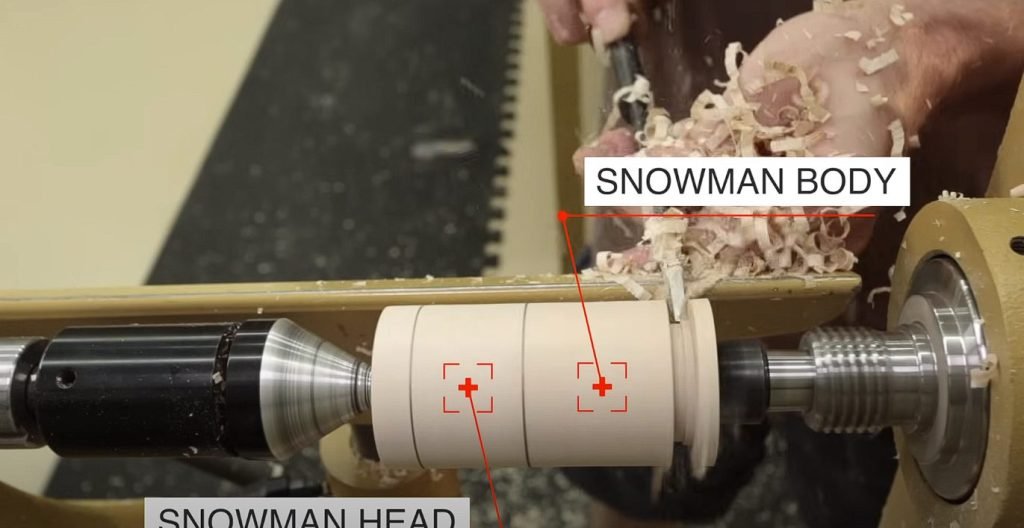
Securing the Blank
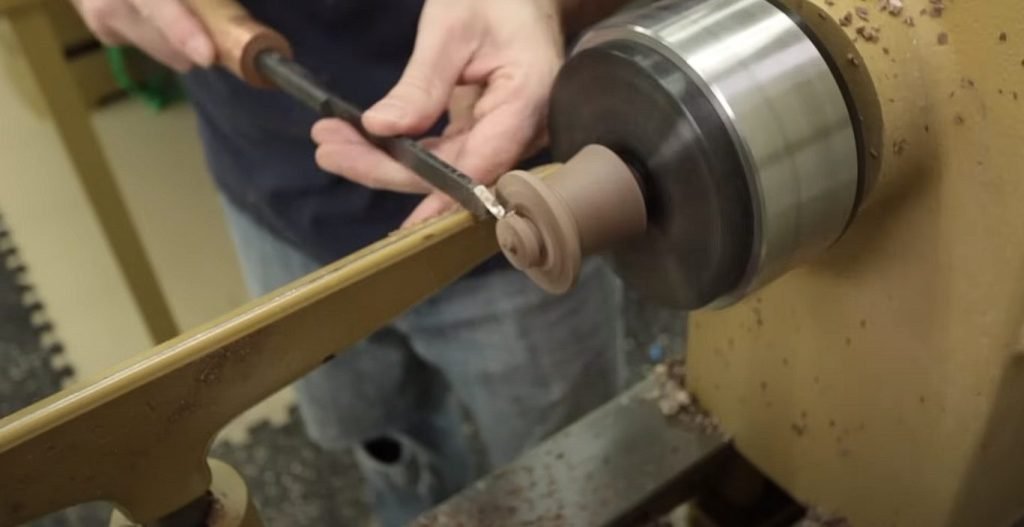
Securing the wood blank properly on the lathe is crucial to ensuring stability during turning. Begin by using a roughing gouge or spindle roughing gouge to create a tenon at one end of your wood blank that matches the size of your chuck jaws. This will allow you to mount it onto the lathe securely.
After creating a tenon, carefully mount it onto the lathe using appropriate safety precautions such as wearing protective gear like goggles and ensuring no loose clothing or accessories are dangling near moving parts. Once tightly secured, start turning at lower speeds before gradually increasing speed while monitoring stability throughout.
Proper securing prevents accidents and ensures consistent results when shaping your snowman project.
Turning the Wood Blank into a Charming Snowman Shape
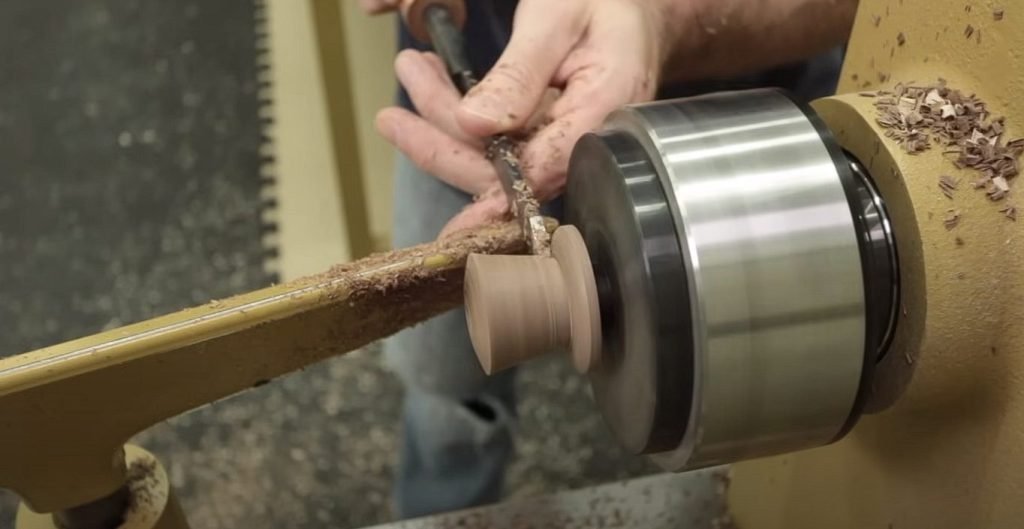
Mastering Basic Techniques
To shape your wood-turned snowman, it’s crucial to master basic wood-turning techniques. Start by creating smooth curves and contours on the wood blank, ensuring symmetry in your design. This involves using different cutting tools to achieve the desired results.
Understanding how each cutting tool functions is essential for carving out the distinct features of your snowman. For instance, a spindle roughing gouge can help you quickly round off square stock, while a bowl gouge is ideal for shaping concave surfaces such as the snowman’s body.
It’s important to visualize how these tools will interact with the wood and plan out which best suits each part of your project. By mastering these techniques, you’ll be able to bring out the unique charm and character in your wood-turned snowman.
Creating Symmetry and Smooth Curves
Maintaining symmetry is critical to achieving an aesthetically pleasing result when working on your wood-turned snowman. Use calipers or measuring tools to ensure uniformity across different snowman sections – from base to head.
As you carve through the wood blank, pay close attention to creating smooth curves that capture the essence of a classic snowman shape. Aim for gentle transitions between the body, neck, and head sections. This attention to detail will elevate your creation from just being a wooden figure to an endearing representation of winter cheer.
Taking my time during this stage allows me to appreciate every aspect of crafting my own unique wood-turned snowman. Seeing all my efforts culminate in a beautifully symmetrical and charming piece that brings joy wherever it’s displayed is gratifying.
Crafting the Head and Hat with Precision
Carving the Head
When creating a wood-turned snowman, carving the head accurately is crucial. Use a lathe to shape the piece of wood into a round head. Please pay attention to proportions, ensuring they’re not too large or too small about the body.
Carve delicate features for your snowman’s face, such as eyes, nose, and mouth. Take care to make these details symmetrical and well-defined. The height and diameter of the head should be in proportion to the body for a balanced look.
Crafting the perfect head is essential because it sets the tone for your entire snowman creation. It’s important not only for aesthetics but also for achieving proper balance and stability.
Personal tip: using calipers helps me measure precise dimensions while carving my snowman’s head on the lathe.
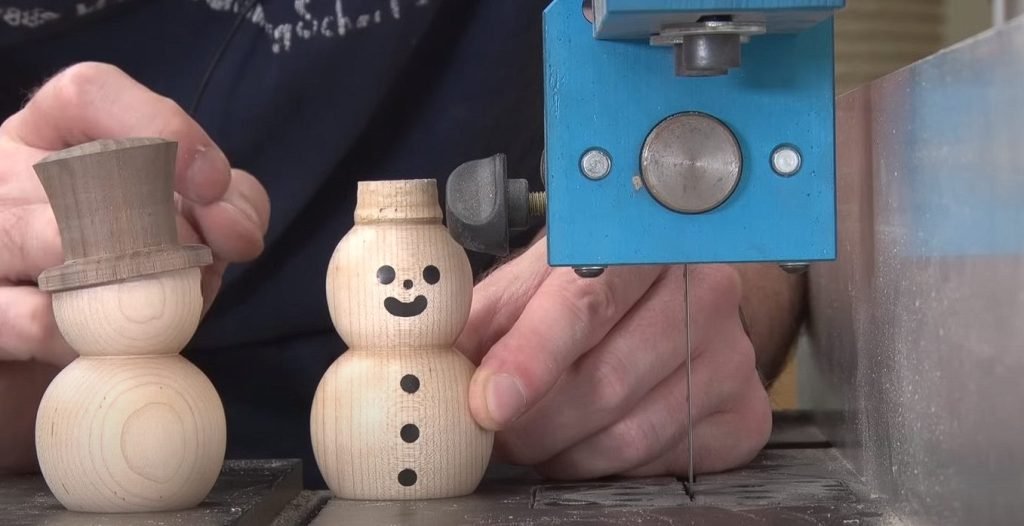
Shaping a Well-Fitted Hat
The hat adds character to your wood-turned snowman. When shaping it, use jaws on your lathe chuck or turner’s tap to ensure a snug fit. Consider its base diameter so it fits securely on your snowman’s head without being too loose or tight.
Once you’ve achieved an appropriate fit, focus on adding details like brim width and overall height of the hat – this will give personality to your creation.
A well-fitted hat completes your snowman figurine and showcases attention to detail in craftsmanship.
Adding Character with Optional Nose and Arms
Nose Options
The nose is a crucial feature that adds character. You can explore options for adding noses, such as wooden dowels or carved pieces. For instance, a small wooden dowel can be attached to the face to create a classic carrot-shaped nose. Alternatively, you could cut a unique nose from scrap wood, giving your snowman an entirely personalized look.
Adding my personal touch, I have found that using different types of wood for the nose can give each snowman its distinctive appearance. It’s also fun to experiment with different shapes and sizes to see how they affect the overall expression of the snowman’s face.
Secure Attachment Techniques
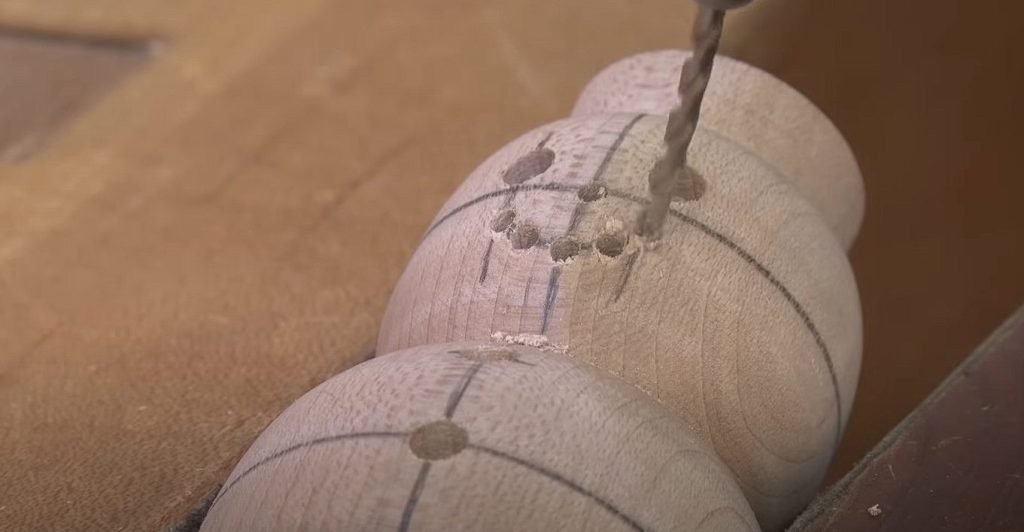
Learning techniques for attaching arms securely is essential when crafting wood-turned snowmen. Whether you carve arms from wood or use other materials like twigs or wire, it is vital to firmly attach them. One method involves drilling small holes in the body where the arms will be placed and then gluing them into position.
In my experience, I’ve discovered that using small screws instead of glue provides extra security for attaching wooden arms. This technique ensures durability and allows for repositioning if needed before finalizing their placement on the snowman.
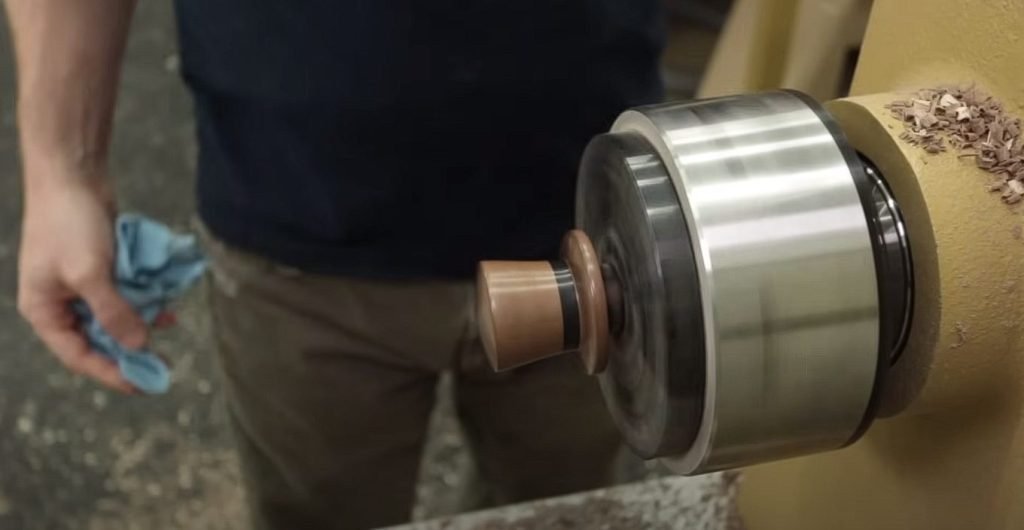
Mastering the Finishing Techniques for a Polished Look
Sanding and Smoothing
To achieve a professional finish on your wood-turned snowman, start by sanding and smoothing the surface. Begin with coarse-grit sandpaper to remove any rough patches or imperfections. Gradually work your way up to finer grits, ensuring that the surface becomes smooth to the touch. Pay special attention to the ends and bottom of the snowman, as these areas often require extra care in sanding.
After achieving a smooth surface, it’s essential to focus on details such as buttons or eye centers using finer-grit sandpaper. This ensures that these areas are perfectly smooth and ready for finishing touches like paint or wood stain.
Applying Finishes
Once you’ve sanded and smoothed the wood-turned snowman, it’s time to apply appropriate finishes for an enhanced appearance. Consider using vibrant paints to add color, or opt for wood stains that bring out the wood’s natural grain. Adding distressing effects can give your snowman a unique look – think about techniques such as crackling or antiquing for added character.
Adding personal insight: I get really creative with my wood-turned projects when applying finishes. Experimenting with different colors and textures allows me to give each piece its personality.
Adding Texture and Distressing Effects
Consider adding texture and distressing effects to make your wood-turned snowman stand out. Use wire brushes or carving tools to create texture on certain parts of the snowman’s body, giving it depth and visual interest. For unfortunate effects, lightly sand certain areas after painting or staining them, creating a weathered look that adds charm.
Reverse Chucking Technique for Detailed Crafting
Understanding the Reverse Chucking Technique
The reverse chucking technique safely removes and repositions your snowman on the lathe for precise crafting. This technique allows woodturners to work on intricate details without risking damage to the already-turned sections of the snowman. By reversing the position of the snowman blank in the lathe, you can access different areas for detailed work, ensuring that every part of your creation receives attention.
When using this technique, it’s crucial to ensure that the snowman blank is securely mounted in both chucks before removing it from one end and placing it back into another. This prevents any wobbling or instability during turning, which could lead to imprecise detailing or accidents.
Understanding how reverse chucking works gives me more confidence when creating fine details on my wood-turned snowmen. It’s a great way to achieve precision without compromising safety.
Tools and Methods for Fine Detailing
Various tools can be employed to create fine details on your wood-turned snowman, such as a roughing gouge for initial shaping and more minor gouges or carving tools for delicate features like eyes, nose, mouth, and buttons. Sandpaper wrapped around dowels or small sticks can help smooth out hard-to-reach areas.
Another method involves using pyrography (wood burning) techniques to add intricate designs or textures. This allows you to personalize each snowman with unique patterns or decorations.
Seeking Inspiration for Your Wood-Turned Snowman
Nature
Nature center can be a great starting point when seeking inspiration for your wood-turned snowman. Think about the shapes and textures you find in the natural world during winter. For instance, the smooth curves of snowdrifts or the texture of tree bark inches could inspire unique design elements for your snowman.
I often take walks in snowy landscapes to observe how different the weather shapes objects and inches. How snow settles on branches or rocks in inches can provide exciting ideas for incorporating organic textures into my wood-turned snowmen.
Traditional Snowman Designs
Traditional snowman designs offer timeless inspiration that can be translated into wooden creations. Consider classic features like carrot noses, coal eyes, and top hats when planning your project. These familiar elements can add a sense of nostalgia to your wood-turned snowman while also serving as a tribute to traditional wintertime symbols.
Growing up, I admired classic snowmen with button eyes and twig arms. Now, I incorporate these nostalgic details into my wood-turned creations to evoke a sense of warmth and familiarity.
Artisan Projects
Exploring projects created by talented artisans is another excellent way to find inspiration for your wood-turned snowman. By studying other artists’ work, you can gather ideas for carving techniques, decorative accents, and overall design concepts that resonate with you.
I love browsing through online galleries showcasing various wood-turning projects from different artists around the world. It’s inspiring to see how each artist brings his or her unique style and creativity to their snowman designs.
Conclusion: Bringing Your Wood-Turned Snowman to Life
After mastering wood-turning a snowman, it’s time to add the finishing touches and bring your creation to life. With precision and attention to detail, the snowman’s head, hat, and optional features like the nose and arms will give it character and charm. The final polishing techniques will ensure a professional, polished look that showcases your craftsmanship. Now, it’s time to step back and admire your handiwork – your wood-turned snowman ready to adorn your home or delight others as a thoughtful gift.
Now that you’ve completed your wood-turned-snowman, consider sharing your newfound expertise with others. Whether through teaching a workshop, creating more unique pieces, or simply inspiring fellow woodworking enthusiasts, your journey in bringing a wood-turned snowman to life can be a catalyst for creativity in others. Keep honing your skills and exploring new projects to continue enjoying the art of woodhanging.
Frequently Asked Questions
Can I use any wood to turn a snowman?
Yes, you can use various types of wood to turn a snowman. However, it’s recommended to choose maple, cherry, or walnut for their smooth grain and ease of carving.
Do I need special tools to turn a wooden snowman?
You will need specific tools such as a lathe, gouges, parting tools, and calipers designed for woodturning. These tools are essential for shaping the wood into the desired snowman form.
How do I add character to my wood-turned snowman?
To add character to your wood-turned snowman, consider using small wooden branches or dowels as arms and adding a carrot-shaped nose. You can also incorporate accessories like scarves or hats to enhance its charm.
What finishing techniques work best for a polished look?
Sanding with progressively finer grits is crucial for a polished look on your wood-turned snowman project. Applying multiple coats of high-quality finish, such as lacquer or polyurethane, will provide durability and sheen.
Is the reverse chucking technique necessary in crafting detailed features?
The reverse chucking technique allows access to the bottom of the piece when crafting intricate details like facial features on the top side. It’s beneficial for achieving precision when working on delicate elements of your wood-turned snowman.