Table of Contents
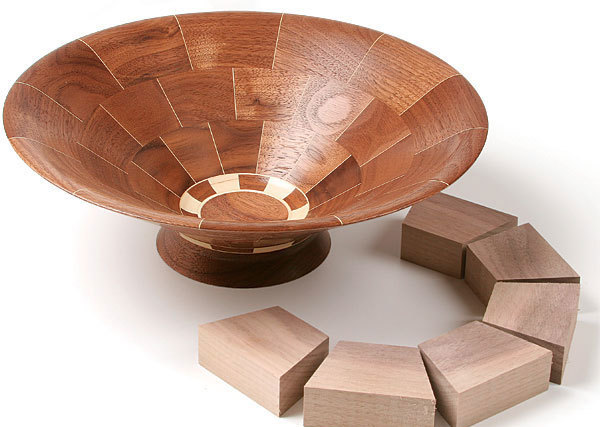
Segmented turning is a woodworking technique where multiple pieces of wood are glued together to form a single, intricate design. This method allows for greater creativity and precision in crafting detailed wooden objects.
Segmented turning offers woodworkers the ability to create complex and visually appealing designs. The process involves cutting and assembling various wood segments into a predetermined pattern before turning the assembly on a lathe. This technique enhances the artistic potential of woodworking, enabling the creation of detailed, symmetrical, and multi-colored pieces.
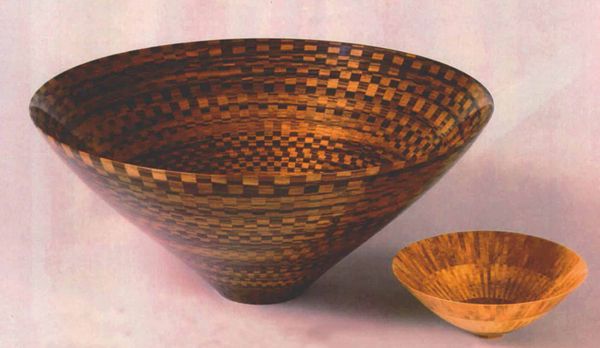
Woodworkers can achieve intricate geometric patterns and unique color combinations by carefully selecting and positioning each segment. Mastering segmented turning requires skill, patience, and an eye for detail, making it a popular method for both hobbyists and professional artisans.
Introduction To Segmented Turning
Segmented woodturning involves combining small pieces of wood. These pieces form beautiful patterns. This method allows for unique designs. Each piece is carefully cut and glued. It requires precision and skill. Artists can create bowls, vases, and more. The process is time-consuming but rewarding. Colors and grains of wood add to the beauty. Patterns can be simple or complex. The final product is a work of art.
Segmented turning offers many benefits. It allows for creative freedom. Artists can use different wood types. This results in stunning contrasts. It also reduces wood waste. Small pieces are used effectively. The final products are very strong. They are less likely to crack. This method improves woodworking skills. It teaches patience and precision. The results are always unique and custom-made.
Essential Tools For Segmented Turning
Segmented turning requires essential tools like a lathe, precision saw, and calipers. Proper jigs and clamps ensure accurate alignment and safety.
Choosing The Right Lathe
A sturdy lathe is crucial. It should have variable speed control. Stability is key for precision. A lathe with a powerful motor is preferred. Choose one with a good reputation. Ensure it fits your workshop space.
Blades And Cutting Instruments
Sharp blades are essential. They ensure clean cuts. Quality carbide-tipped tools last longer. High-speed steel blades are also popular. Keep tools sharp for best results. Use a honing guide for precision sharpening.
Clamps And Glues For Assembly
Strong clamps hold pieces in place. They ensure even pressure. Use adjustable clamps for various sizes. Quality wood glue is a must. It provides a strong bond. Consider Titebond or similar brands. Allow glue to cure fully before turning.
Designing Your Segmented Project
Start by drawing your design on paper. This helps to visualize the final look. Measure each part carefully. Use clear lines and notes. This avoids mistakes later. Keep the sketch simple and easy to understand.
Choose wood types that are easy to work with. Maple, cherry, and walnut are good options. Different woods have different strengths. Pick ones that suit your project needs. Ensure the woods are free from knots and cracks.
Think about the color combinations. Dark and light woods create contrast. Patterns can make your project unique. Alternate wood pieces for a striking effect. Test the colors by placing small pieces side by side.
Cutting Techniques For Precision
Precise measurements are crucial for segmented turning. Always use a reliable ruler or tape measure. Double-check all measurements before making a cut. Marking tools should be sharp and easy to read. Use a pencil or fine-tip marker for clear lines. Avoid smudging the markings to maintain accuracy.
Angle cuts require extra care and attention. Set your miter saw to the correct angle. Test cuts on scrap wood can prevent mistakes. Always hold the wood firmly in place. Use clamps if necessary for added stability. Smooth, even pressure ensures a clean cut.
A sharp blade is essential for smooth cuts. Replace dull blades to avoid rough edges. Sand the cut edges to remove any splinters. Use fine-grit sandpaper for best results. Cut slowly to maintain control and precision. Patience is key for perfect cuts.
Gluing And Clamping Strategies
Effective gluing and clamping strategies are essential in segmented turning to ensure strong, seamless joints. Proper alignment and even pressure distribution prevent gaps and enhance the final product’s durability and appearance.
Preparing For A Strong Bond
Clean all surfaces to remove dust. Use sandpaper to make surfaces smooth. Choose the right glue for your wood type. Apply glue evenly on all surfaces. Wipe off any excess glue before it dries.
Gluing Sequence And Application
Start gluing from the center of the piece. Work your way outward. Apply glue in small sections. Press pieces together firmly. Ensure each piece is aligned correctly. Use a brush for even glue application. This avoids air bubbles. Check alignment regularly during gluing.
Clamping For Even Pressure
Use multiple clamps for even pressure. Place clamps at regular intervals. Tighten clamps slowly and evenly. Ensure no gaps between pieces. Check for any glue squeeze-out. Wipe off excess glue promptly. Let the glue dry completely before removing clamps.
Turning Techniques For Segmented Pieces
Start by ensuring the segmented blank is centered on the lathe. Use a faceplate or a chuck for secure mounting. Check that the blank is balanced to avoid vibrations. Tighten the mounting securely to prevent any movement during turning.
Use sharp tools for clean cuts. Hold the tool firmly and maintain a steady hand. Control the tool angle to avoid catches. Apply light pressure to prevent gouging the wood. Make smooth, even passes with the tool.
Blend the segments seamlessly by using light cuts. Sand the piece between cuts to ensure smooth transitions. Check for any ridges or uneven spots. Use finer grits of sandpaper for a polished finish. Aim for a uniform surface across all segments.
Sanding And Finishing Segmented Works
Sanding makes the wood smooth. Always start with a coarse grit. Then, use finer grits. This removes scratches. Sand along the grain. Clean dust with a cloth. Repeat if needed. This gives a flawless surface.
Choose a finish that suits your project. Polyurethane is durable. Oils like linseed or tung enhance the wood’s natural look. Shellac is quick-drying. Each finish has its own look and feel. Test on a scrap piece first.
Apply finish in thin, even coats. Use a brush or cloth. Let each coat dry fully. Sand lightly between coats. This helps the finish adhere better. Multiple coats give a stronger finish. Follow the product’s instructions.

Credit: www.finewoodworking.com
Advanced Segmented Turning Concepts
Adding curves and hollow forms can make your work stand out. Curves create a smooth and flowing look. Hollow forms reduce weight and add intrigue. Use a lathe to shape the wood. Sand the wood for a polished finish. Always ensure safety while working with tools.
Patterns and designs add complexity to your projects. Geometric shapes are very popular. Try combining different shapes for a unique effect. Use contrasting wood colors for more impact. Precision is key for intricate designs. Measure twice and cut once to avoid mistakes.
Mixing materials can produce striking results. Combine wood with metal or resin. Each material has its own texture. This creates a multi-dimensional look. Experiment with different material types. Always test materials before finalizing your design.
Troubleshooting Common Issues
Misalignments occur when the pieces don’t fit together properly. This can ruin the final look. To fix this, ensure each segment is cut accurately. Use a jig for precise cuts. Align each piece carefully before gluing. Check all angles and edges. Sand down any rough spots. This will help in achieving a smooth fit.
Gaps and cracks can appear due to improper gluing. Ensure you use enough glue. Clamp the pieces tightly while drying. Fill small gaps with wood filler. For larger cracks, consider using a matching wood strip. Sand the area smoothly after fixing. This will blend the repair with the rest of the piece.
Wood movement happens because of moisture. Store wood in a dry place. Seal the wood properly after turning. Use finishes that protect against moisture. Allow the wood to acclimate to your workshop. This reduces the chances of movement and warping.
Showcasing Your Finished Pieces
Showcasing your segmented turning pieces can captivate an audience. Highlight intricate designs and craftsmanship to impress collectors and enthusiasts. Use high-quality images to emphasize the unique patterns and details.
Photographing Your Work
Good photos make your work look amazing. Use a clean background. Natural light works best. Use a tripod for steady shots. Show different angles. Highlight unique details. Edit photos to improve quality.
Display Options And Ideas
Use shelves to show your pieces. Place them at eye level. Group similar items together. Use lighting to highlight features. Rotate pieces often. Add labels with information. Make sure everything is clean.
Selling And Marketing Your Creations
Sell online through Etsy or eBay. Create a website for your work. Use social media to share updates. Join local craft fairs. Partner with local shops. Offer custom orders. Create business cards. Always be friendly and professional.
Learning From The Masters
Watching master turners is very helpful. They use unique techniques. Observing them can spark new ideas. Many experts share their work online. This makes learning accessible for everyone.
Local workshops are great for hands-on learning. Community classes offer direct feedback. You can ask questions and get instant answers. Many classes provide tools and materials. This allows you to practice without a big investment.
Many websites offer free tutorials. YouTube is full of segmented turning videos. Online forums are excellent for advice. Websites often have step-by-step guides. These resources are available anytime you need them.

Credit: www.bucksturners.com
Conclusion: The Journey To Segmented Turning Mastery
Mastering segmented turning requires patience, precision, and creativity. A blend of skill and artistry transforms simple wood pieces into intricate designs. This journey enhances both craftsmanship and personal satisfaction.
Reflecting On The Craft
Segmented turning is a beautiful craft. It requires patience and skill. Each piece tells a story. Every turn reveals something new. The wood’s natural beauty shines through. Mastering this art is a rewarding journey.
Continuing Education And Practice
Learning never stops in segmented turning. Practice is key. Workshops and online tutorials are helpful. Books offer great insights. The more you practice, the better you get. Mistakes become learning opportunities. Dedication brings improvement.
Joining The Segmented Turning Community
The community is welcoming. Sharing tips and techniques is common. Forums and social media are great for connecting. Local clubs often hold meetings. These gatherings are fun and educational. Newcomers find great support. Everyone’s journey is unique, but shared.

Credit: www.finewoodworking.com
Frequently Asked Questions
What Are The Two Types Of Woodturning?
The two types of woodturning are spindle turning and faceplate turning. Spindle turning involves shaping wood along its grain, while faceplate turning shapes wood across its grain.
How To Calculate Segmented Bowl?
To calculate a segmented bowl, measure the diameter and height. Divide the bowl into segments. Calculate each segment’s dimensions and angles. Use a segmented bowl calculator for precision.
What Wood Turning Tools Should A Beginner Use?
Beginners should use a spindle roughing gouge, bowl gouge, parting tool, skew chisel, and scraper for wood turning. These tools cover basic needs.
What Chisel To Use For Wood Turning?
Use a spindle gouge for detailed work, a bowl gouge for shaping, and a skew chisel for smooth finishes.
Conclusion
Segmented turning offers woodworkers endless possibilities for creativity and precision. Master this technique to elevate your woodworking projects. Experiment with different patterns and woods to create unique, stunning pieces. Embrace the learning process and watch your skills grow. Happy turning!