
Table of Contents
A DIY wood turning lathe lets you shape and craft wood pieces at home. It’s a rewarding and creative project.
Building your own wood turning lathe can save money and provide immense satisfaction. This tool allows you to create intricate wooden items like bowls, spindles, and furniture legs. With some basic materials, tools, and woodworking skills, you can construct a functional and sturdy lathe.
Start by gathering materials like a motor, pulleys, and a sturdy frame. Ensure all components are securely fastened to maintain safety during operation. A DIY lathe not only enhances your woodworking skills but also offers endless possibilities for crafting unique wooden items. Dive into this project and enjoy the process of creating your personalized wood turning lathe.
Introduction To Diy Wood Turning
DIY wood turning is a rewarding and creative hobby. It allows you to transform raw wood into beautiful, functional pieces. From bowls to pens, the possibilities are endless. This guide will introduce you to the basics of DIY wood turning.
The Appeal Of Wood Crafting
Wood crafting appeals to many due to its hands-on nature. You can create unique and personalized items. Working with wood also provides a sense of accomplishment. Many find it relaxing and therapeutic.
Some benefits of wood crafting include:
- Creative expression
- Personalized gifts
- Home decor
- Functional items
Basics Of A Wood Turning Lathe
A wood turning lathe is a simple yet powerful tool. It spins a piece of wood while you shape it with various tools. Understanding the parts of a lathe is crucial for beginners.
| Part | Description |
|---|---|
| Headstock | Holds the motor and spindle. |
| Tailstock | Supports the wood on the opposite end. |
| Tool Rest | Supports your tools while turning. |
| Bed | Connects the headstock and tailstock. |
Getting started with a wood turning lathe involves:
- Setting up your lathe
- Choosing the right wood
- Securing the wood on the lathe
- Using proper safety gear
- Practicing basic cuts
Always remember to wear safety glasses and gloves. This will protect you from flying debris and sharp tools.
Designing Your Wood Turning Lathe
Designing your own wood turning lathe is an exciting project. You get to create a machine tailored to your needs. This guide will help you through the process. Let’s dive into the key steps.
Selecting The Right Materials
Choosing the right materials is crucial. Strong and durable materials ensure your lathe lasts longer. Steel and hardwood are popular choices for the frame. Steel provides strength, while hardwood offers a classic look.
- Steel for the frame
- Hardwood for the base
- Aluminum for lightweight parts
Use high-quality bearings for smooth operation. Bearings reduce friction and increase efficiency. Ensure all parts fit well together. This will prevent any wobbling or instability.
Blueprints And Measurements
Accurate blueprints are essential. They guide you in building the lathe correctly. Start by sketching your design on paper.
- Measure the dimensions of your workspace.
- Decide the length and width of the lathe.
- Include detailed measurements for each part.
Here’s a simple table for basic measurements:
| Part | Length (inches) | Width (inches) |
|---|---|---|
| Frame | 48 | 12 |
| Base | 50 | 14 |
| Tool Rest | 10 | 3 |
Double-check all measurements before cutting any material. Precision is key for a functional lathe. Accurate blueprints save you time and avoid costly mistakes.
Tools And Materials Required
Starting a DIY wood turning project can be exciting and rewarding. To get started, you need the right tools and materials. This section will guide you through the essential power tools and safety gear required for a successful project.
Essential Power Tools
The first thing you need is a wood turning lathe. This machine rotates the wood so you can shape it. Here are some other essential power tools:
- Lathe Chisels: These come in various shapes and sizes. They help you carve the wood.
- Drill: A power drill is useful for creating holes in your project.
- Bandsaw: This tool helps you cut the wood into the desired shape before turning it on the lathe.
- Sanders: A sander smoothens the wood surface after turning.
Safety Gear And Equipment
Safety is crucial when working with power tools. Here are some essential safety gear and equipment:
- Safety Glasses: Protect your eyes from wood chips and dust.
- Ear Protection: Use ear muffs or plugs to protect your hearing from loud tools.
- Dust Mask: Prevent inhaling harmful wood dust.
- Gloves: Use gloves to protect your hands from sharp tools and splinters.
By using the right tools and safety gear, you can ensure a safe and enjoyable wood turning experience. Make sure to always follow safety guidelines.
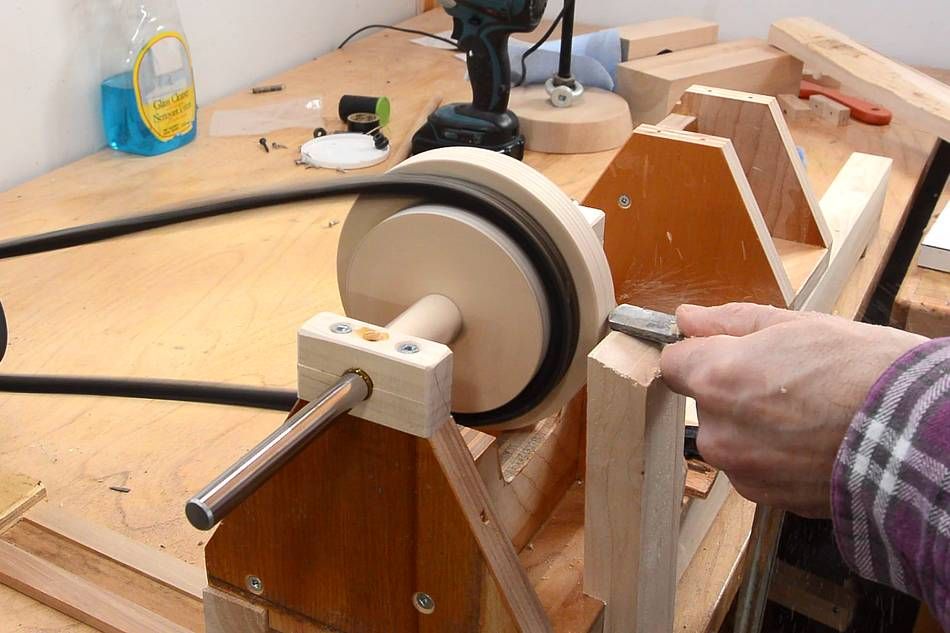
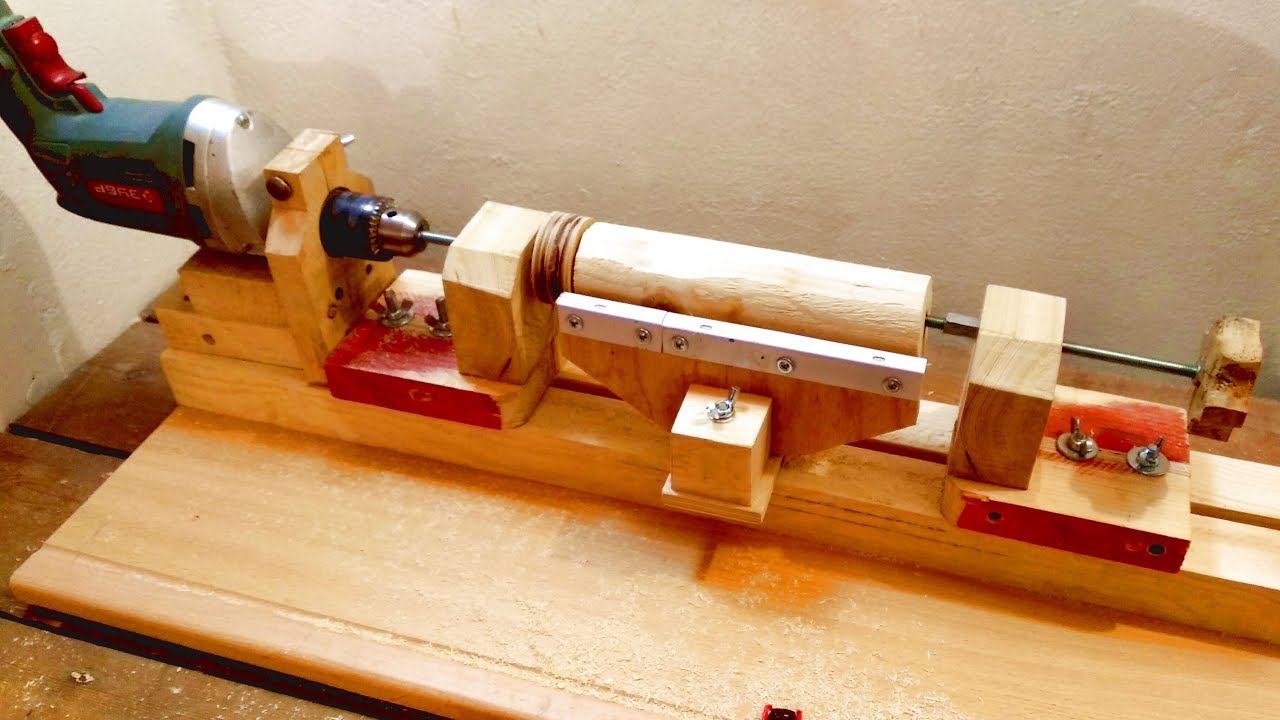
Building The Lathe Step By Step
Creating your own wood turning lathe can be a rewarding experience. Follow this step-by-step guide to build a functional lathe. From constructing the base to attaching the motor, each step is crucial. Let’s dive in!
Constructing The Base
The base is the foundation of your lathe. It must be strong and stable. Use hardwood like oak or maple. Cut two 4×4 pieces for the legs. Ensure they are even. Next, cut two 2×4 pieces for the top and bottom braces. Secure the braces to the legs using screws.
Materials needed:
- Hardwood (oak or maple)
- Screws
- Drill
- Measuring tape
Measure and mark all pieces before cutting. This ensures precision. Assemble the base on a flat surface. Check for level and stability.
Assembling The Spindle And Tailstock
The spindle and tailstock are key components. The spindle holds the wood. The tailstock supports the other end. Start by mounting the spindle. Use a threaded rod and bearings. Secure the rod to the base. Attach the bearings to each end.
Next, construct the tailstock. Use a piece of hardwood. Drill a hole for the live center. Attach the tailstock to the base. It should slide easily.
Materials needed:
- Threaded rod
- Bearings
- Hardwood
- Live center
Ensure the spindle and tailstock align perfectly. This prevents wobbling during operation.
Attaching The Motor
The motor powers the lathe. Choose a motor with variable speed. Secure it to the base with bolts. Attach a pulley to the motor shaft. Connect the pulley to the spindle with a belt.
Materials needed:
- Variable speed motor
- Bolts
- Pulley
- Belt
Ensure the belt has the right tension. Too tight or too loose affects performance. Finally, plug in the motor and test the lathe. Make adjustments as needed for smooth operation.
Finishing Touches For Your Lathe
After building your DIY wood turning lathe, the finishing touches are essential. These final steps ensure your lathe functions smoothly and looks great. Let’s dive into sanding, painting, and calibrating your lathe for precision.
Sanding And Painting
Sanding is a crucial step for a smooth finish. Use fine-grit sandpaper to sand the entire lathe. This removes any rough spots or splinters. Pay special attention to the edges and corners.
- Start with 120-grit sandpaper.
- Move to 220-grit for a finer finish.
- Finish with 320-grit for a smooth surface.
Once the sanding is complete, it’s time for painting. Choose a durable paint that can withstand the wear and tear of woodturning.
- Apply a primer to the lathe.
- Let the primer dry completely.
- Paint with your chosen color.
- Apply a second coat if needed.
- Finish with a clear sealant for protection.
Calibrating The Lathe For Precision
Calibrating your lathe ensures it works with high precision. Follow these steps to calibrate your lathe accurately.
| Step | Description |
|---|---|
| 1 | Check the alignment of the headstock and tailstock. |
| 2 | Adjust the tool rest for optimal height. |
| 3 | Test the lathe with a piece of scrap wood. |
| 4 | Make minor adjustments as needed. |
Ensure the tool rest is at the correct height. This helps in achieving precise cuts. Use a level to check the lathe’s balance. Adjust the feet if the lathe wobbles.
Once calibrated, your lathe is ready for woodturning projects. These finishing touches improve both the functionality and appearance of your DIY lathe.
Credit: www.popularmechanics.com
Turning Your First Project
Starting your first wood turning project is an exciting journey. It’s rewarding to see a simple piece of wood transform into a beautiful object. In this section, we’ll guide you through the essential steps. Follow along and get ready to create your first masterpiece.
Preparing The Wood Blank
Before you start turning, prepare your wood blank. Choose a suitable wood piece. Ensure it’s free from cracks and knots.
- Measure the wood blank to fit your lathe.
- Cut the blank to the desired size.
- Mark the center on both ends of the blank.
Secure the wood blank on the lathe. Use the tailstock and headstock to hold it firmly. This prevents wobbling during turning.
Basic Turning Techniques
Understand the basic turning techniques to shape your project. Start with a roughing gouge to shape the wood.
- Turn on the lathe at a low speed.
- Hold the gouge at a 45-degree angle.
- Remove the excess wood to create a cylinder shape.
Switch to a spindle gouge for finer details. Practice these techniques to gain confidence.
- Create beads and coves using smooth, controlled cuts.
- Use a skew chisel for clean, precise lines.
Remember to always keep your tools sharp. Sharp tools make cleaner cuts and reduce the risk of accidents.
Advanced Wood Turning Techniques
Advanced wood turning techniques take your DIY projects to the next level. These methods allow for the creation of more intricate and polished pieces. Mastering these skills requires practice but offers great rewards. Let’s dive into two advanced techniques: creating complex shapes and sanding and finishing on the lathe.
Creating Complex Shapes
Creating complex shapes on a lathe can seem daunting. Start by choosing the right wood. Softwoods are easier to shape but hardwoods offer better detail.
- Planning: Sketch your design beforehand. Visualize the final shape.
- Tools: Use specialized gouges and chisels. They help achieve intricate details.
- Techniques: Practice the push cut and pull cut. They control the shape better.
Take your time with each cut. Rushing leads to mistakes. Gradually work towards your desired shape. This method ensures precision and reduces errors.
Sanding And Finishing On The Lathe
Sanding and finishing are crucial for a polished look. Sanding removes rough edges. Finishing enhances the wood’s natural beauty.
- Start with coarse sandpaper: Use 80-grit to remove major imperfections.
- Progress to finer grits: Move to 120, then 220-grit for a smooth finish.
- Keep the lathe running: This ensures even sanding across the piece.
For finishing, apply a wood sealer or oil. This protects the wood and adds shine. Use a clean cloth to apply the finish evenly.
| Step | Action | Tools Needed |
|---|---|---|
| 1 | Initial Sanding | 80-grit sandpaper |
| 2 | Fine Sanding | 120, 220-grit sandpaper |
| 3 | Finishing | Wood sealer or oil, clean cloth |
These advanced techniques require patience and practice. But the results are worth the effort. Your wood pieces will look more professional and detailed.
Credit: www.youtube.com
Maintaining Your Diy Lathe
Keeping your DIY wood turning lathe in top shape is crucial. Regular maintenance ensures smooth operation and extends the lifespan of your lathe. Proper care also guarantees safety while working on your projects. Below are some essential tips for maintaining your DIY lathe.
Regular Cleaning And Lubrication
Regular cleaning prevents dust and debris buildup. Follow these steps:
- Wipe down the lathe after each use.
- Remove shavings and dust with a brush.
- Use compressed air for hard-to-reach areas.
Lubrication is key to smooth operation. Here’s how:
- Lubricate moving parts weekly.
- Use oil or grease recommended by the manufacturer.
- Check for any signs of rust and treat immediately.
Troubleshooting Common Issues
Even with regular maintenance, issues may arise. Here are common problems and solutions:
| Issue | Possible Cause | Solution |
|---|---|---|
| Lathe not starting | Power supply issue | Check the power cord and switch. |
| Unusual noise | Loose parts | Tighten all screws and bolts. |
| Vibration | Imbalanced workpiece | Ensure the workpiece is evenly balanced. |
By following these simple steps, you can keep your DIY lathe running smoothly. Regular cleaning and lubrication are essential. Troubleshooting common issues ensures your lathe performs optimally.
Project Ideas To Inspire
Discovering new project ideas for your DIY wood turning lathe can be exciting. Explore these creative projects to inspire your next woodworking adventure. Let’s dive into some fun and rewarding ideas.
Turning Bowls And Plates
Turning bowls and plates is a wonderful way to start. These projects are perfect for beginners and provide useful household items. You can use a variety of woods for different effects.
- Start with a simple bowl shape.
- Experiment with different sizes and depths.
- Try using exotic woods for unique patterns.
Crafting Wooden Pens And Art Pieces
Wooden pens make excellent gifts. They are also a good way to practice precision.
- Choose a high-quality pen kit.
- Select an attractive wood blank.
- Follow the kit instructions carefully.
Creating wooden art pieces allows for endless creativity. From small sculptures to intricate designs, the possibilities are vast.
| Project Type | Difficulty Level |
|---|---|
| Miniature Sculptures | Beginner |
| Intricate Designs | Advanced |

Credit: www.instructables.com
Frequently Asked Questions
Can You Do Wood Turning Without A Lathe?
Yes, you can do wood turning without a lathe. Use a drill, chisel, or carving tools for similar results.
What Type Of Wood Is Best For Turning On A Lathe?
Hardwoods like maple, cherry, and walnut are ideal for lathe turning. They offer durability and smooth finishes.
Can You Make Money With A Wood Lathe?
Yes, you can make money with a wood lathe. Create and sell handcrafted items like bowls, pens, and furniture.
Can I Use A Drill Press As A Lathe?
No, a drill press is not suitable for use as a lathe. It lacks the necessary stability and control.
Conclusion
Creating your own DIY wood turning lathe can be a rewarding experience. It saves money and enhances your woodworking skills. With the right tools and guidance, you can produce quality pieces. Start your journey today and enjoy the satisfaction of crafting unique wooden items.
Happy woodworking!