Table of Contents
Turning bowls on a wood lathe involves shaping wood into a bowl using a lathe and cutting tools. It requires precision and practice.
Woodturning is an ancient craft that transforms raw wood into beautiful, functional items. A wood lathe is a key tool in this process. The lathe spins the wood while the turner shapes it with various cutting tools. Turning bowls is a popular project for woodturners, offering both beginners and experts a rewarding challenge.
Proper technique and safety are crucial for successful and enjoyable woodturning. By mastering the basics, you can create stunning, handcrafted bowls that showcase your skill and creativity. Woodturning also provides a satisfying way to work with your hands and produce unique, artisanal pieces.
Introduction To Woodturning
Crafting wooden bowls is a fun and rewarding hobby. Many people find it relaxing and therapeutic. The process transforms a simple block of wood into a beautiful, functional piece. This art has been practiced for centuries.
The Appeal Of Crafting Wooden Bowls
Each wooden bowl is unique due to the natural grain. The finished product often has a rustic charm. Handmade bowls make excellent gifts and can be used in daily life. They add a touch of nature to any home.
Basics Of A Wood Lathe
A wood lathe is a machine used to shape wood. It spins the wood while you carve it. The lathe consists of several parts. These include the bed, headstock, tailstock, and tool rest. Each part plays a vital role in the turning process.
| Part | Function |
|---|---|
| Bed | Supports the other parts |
| Headstock | Holds the wood and spins it |
| Tailstock | Supports the other end of the wood |
| Tool Rest | Supports your carving tools |

Credit: carterandsontoolworks.com
Selecting The Right Wood
Choosing the right wood ensures smooth turning and a beautiful finish. Hardwoods like maple and cherry are ideal for bowl making. Quality wood minimizes cracks and imperfections, enhancing the final product.
Types Of Wood For Bowl Turning
Choose hardwoods like maple and walnut. These woods are durable and strong. Softwoods like pine are not recommended. They can be too weak and break easily. Fruitwoods such as cherry and apple are also good choices. These woods have beautiful colors and textures.
Considering Wood Grain And Texture
Straight grain wood is easier to turn. It also looks neat and even. Wood with a fine texture is smoother to work with. Avoid wood with knots and cracks. These can cause the bowl to break. Always check the moisture content of the wood. Dry wood is better for bowl turning.
Essential Woodturning Tools
Master turning bowls on a wood lathe with essential tools like spindle gouges, bowl gouges, and scrapers. Achieve precision and smooth finishes by using properly sharpened chisels and parting tools.
Chisels, Gouges, And Scrapers
Woodturning needs special tools. Chisels, gouges, and scrapers are very important. Chisels help shape the wood. Gouges create smooth curves. Scrapers give a fine finish. Using the right tool makes the job easier. Always keep them sharp.
Sharpening Your Tools
Sharp tools are safe tools. Use a grinding wheel to sharpen. Hold the tool at the right angle. Keep it steady while sharpening. Do not press too hard. Check often to see if it is sharp. Sharp tools cut better and are safer.
Preparing The Wood Blank
First, choose a suitable wood blank for your bowl. Use a saw to cut the wood to the right size. The wood should be slightly larger than the final bowl size. This allows for shaping and smoothing. Ensure the cut is even to avoid issues later. Check the wood for any cracks or knots.
Place the wood blank securely on the lathe machine. Use a faceplate or a chuck to hold the wood. Ensure it is centered and tightly fixed. This prevents wobbling during turning. Turn on the lathe at a low speed to test the balance. Adjust as needed for smooth operation.
Lathe Operation And Safety
Turning bowls on a wood lathe requires precision and adherence to safety protocols. Always wear protective gear and secure the wood properly. Regularly inspect the lathe for any defects to ensure smooth operation.
Setting Up The Lathe
First, place the lathe on a sturdy table. Ensure it is stable and level. Next, check all parts of the lathe. Make sure they are in good condition. Then, adjust the tool rest to the correct height. This helps in smooth operation. Always use sharp tools. Dull tools can be dangerous. Finally, secure the wood piece firmly. It should not wobble during turning.
Safety Measures During Use
Always wear safety goggles. They protect your eyes from flying wood chips. Use hearing protection. The lathe can be very loud. Tie back long hair. Loose hair can get caught in the machine. Never wear loose clothing. It can also get caught. Keep your hands away from the moving parts. Stop the lathe before making adjustments. Regularly check that all parts are tight and secure.
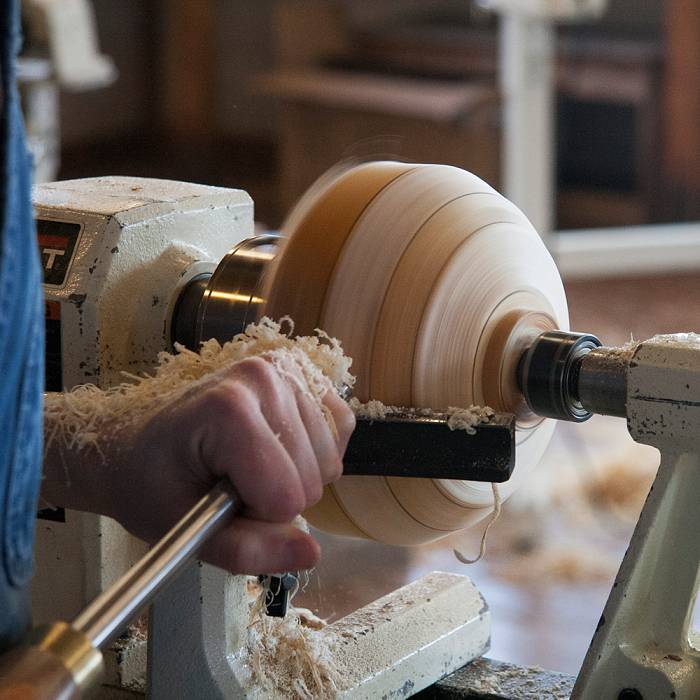
The Bowl Turning Process
Start with a block of wood. Secure it on the lathe. Use a gouge tool to shape the outside. Move the tool slowly. Create the bowl’s basic shape. Make sure the surface is smooth. Use sandpaper for a fine finish. Always wear safety gear.
Secure the bowl on the lathe again. Use a hollowing tool to carve inside. Remove wood gradually. Keep the wall thickness even. Check your progress often. Smooth the inside with sandpaper. Be careful near the edges. Safety gear is a must.
Advanced Techniques
Mastering advanced techniques in bowl turning on a wood lathe elevates craftsmanship. These methods enhance precision, creating stunning, intricate designs.
Creating Thin-walled Bowls
Creating thin-walled bowls requires skill and patience. Use sharp tools for this task. They help make precise cuts. Always check the bowl’s thickness. A good practice is to use a caliper. This tool helps maintain even walls. Work slowly to avoid mistakes. Thin walls can break easily. Keep the lathe speed steady. High speed can cause vibrations. Vibrations can ruin the bowl. Regularly stop and inspect your work.
Adding Decorative Elements
Decorative elements make bowls unique. Try adding grooves or beads. Use specialized tools for this. They give clean lines. Carving is another option. Simple patterns work best. Paint can add color. Choose non-toxic paints for safety. Woodburning creates intricate designs. Practice on scrap wood first. Inlays add a touch of elegance. Use contrasting wood for inlays. Ensure they are securely glued.
Credit: www.renaissancewoodworker.com
Finishing Your Bowl
Finishing your bowl involves careful sanding and polishing to achieve a smooth, flawless surface. Mastering these techniques enhances the beauty and durability of your wood-turned creations.
Sanding Techniques
Start with coarse sandpaper. Use a grit of 80 to 120. Sand the bowl’s surface evenly. Switch to finer grits for a smoother finish. Move to 150, 220, and finally 320 grit. Always sand with the grain. This avoids scratches. Keep the bowl spinning on the lathe. Use light pressure. This ensures a uniform finish. Wipe the bowl clean between grits. Remove all dust and debris. This helps achieve a smooth finish. Repeat if necessary for the best results.
Applying Finishes And Sealants
Choose a finish based on your bowl’s use. Food-safe finishes are best for bowls that hold food. Apply the finish with a clean cloth. Spread it evenly over the surface. Let the finish soak in for a few minutes. Wipe off any excess. Sealants protect the wood from moisture. Apply a thin coat of sealant. Allow it to dry completely. Sand lightly with fine grit sandpaper. Apply additional coats if needed. Each layer adds protection and shine.
Troubleshooting Common Issues
Start with quality wood to avoid cracks. Green wood is more likely to split. Dry wood works better. Seal the ends of the wood to prevent cracking. Use a sharp tool for smooth cuts. Avoid sudden force on the wood. Keep your lathe speed steady and controlled. Inspect your bowl often for tiny cracks.
Warping happens when wood dries unevenly. Store wood in a cool, dry place. Rotate the bowl regularly during drying. Use consistent thickness for the bowl walls. Slow drying helps reduce warping. Wrap the bowl in paper to slow down drying. Re-turn warped bowls on the lathe.
Credit: northhouse.org
Project Ideas And Inspiration
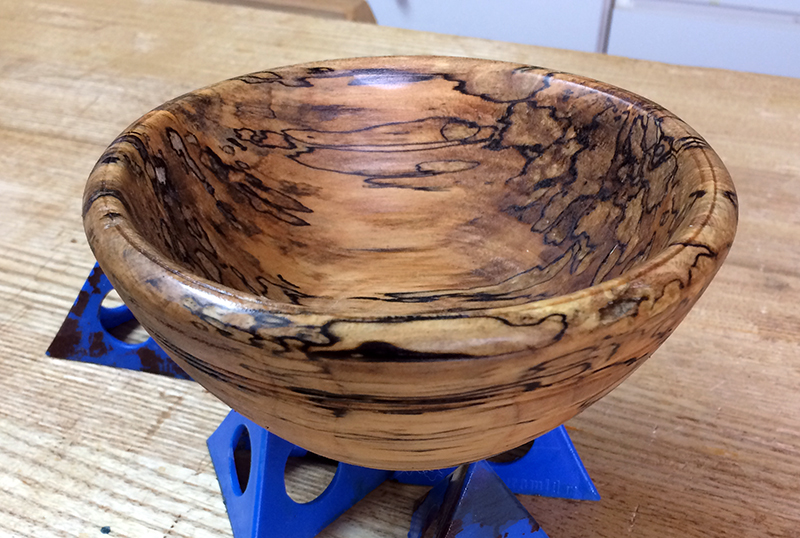
Explore a stunning gallery of bowls made on wood lathes. Each bowl showcases unique designs and textures. You can find inspiration from these beautiful creations. Notice how different woods create distinct patterns. Experiment with various techniques to achieve different effects. Try out new designs and shapes for your bowls. Push your creativity to new levels. This gallery will spark ideas for your next woodturning project.
Practice helps improve your woodturning skills. Start with basic shapes and gradually try more complex designs. Learn to use different tools effectively. Join woodturning clubs to share knowledge and get feedback. Attend workshops to learn from experts. Keep experimenting and refining your techniques. Consistent practice leads to mastery. Always prioritize safety while working on the lathe.
Maintaining Your Equipment
Always clean your wood lathe after use. Use a soft brush to remove sawdust. Wipe down all surfaces with a damp cloth. Dry everything thoroughly to prevent rust. Store your lathe in a dry place. Cover it with a dust sheet for extra protection.
Check the lathe belts for wear and tear. Replace them if they look worn. Oil the moving parts regularly. This keeps them running smoothly. Tighten any loose screws or bolts. Inspect the tool rest and tailstock. Ensure they are secure and aligned. Sharpen your tools before each use.
Joining The Woodturning Community
Local workshops and classes offer hands-on learning. These sessions help you learn faster. You meet other woodturning enthusiasts. Sharing tips and tricks becomes easy. Experienced instructors guide you step-by-step. This ensures you avoid common mistakes. You also get to use professional equipment. This makes learning safer and more fun.
Online resources provide valuable information. Many websites offer free tutorials. Forums allow you to ask questions. Experts and hobbyists share advice. You can watch videos to learn new techniques. Online communities are very supportive. They help you improve your skills. You can share your progress with others. This keeps you motivated and engaged.
Frequently Asked Questions
What Speed Do You Turn Bowls On A Lathe?
Turn bowls on a lathe at 500-1000 RPM for rough shaping. Use 1000-3000 RPM for fine finishing. Adjust speed based on bowl size.
What Do I Need For My Lathe To Turn Bowls?
You need a lathe, bowl gouge, faceplate or chuck, and wood blanks. Ensure safety gear like goggles and a dust mask.
What Is The Best Wood For Making Bowls On A Lathe?
The best wood for making bowls on a lathe includes maple, cherry, walnut, and mahogany. These woods are durable and have beautiful grain patterns. Avoid softwoods like pine, as they are harder to work with and less durable.
What Size Lathe For Bowl Turning?
For bowl turning, a lathe with a swing of at least 12-16 inches is ideal. Ensure it has a sturdy base.
Conclusion
Mastering the art of turning bowls on a wood lathe can be deeply rewarding. This craft combines creativity with skill, offering endless possibilities. Whether you’re a novice or an expert, each project will enhance your abilities. Embrace the journey and let your passion for woodworking flourish.
Enjoy the process and create stunning, unique pieces.