Table of Contents
Segmented woodturning patterns involve creating intricate designs by assembling pieces of wood before turning them on a lathe. This technique allows for stunning visual effects and intricate geometric shapes.
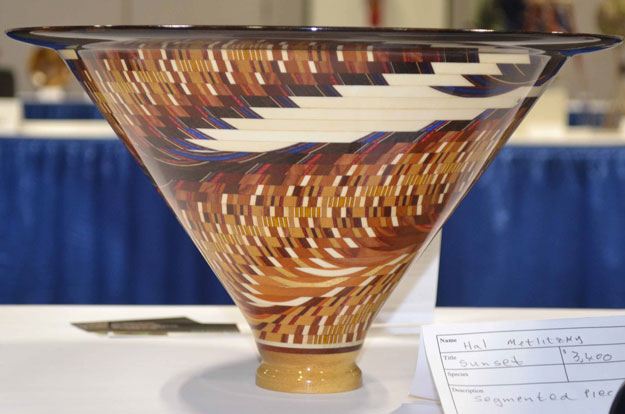
Segmented woodturning is a captivating art form that combines precision and creativity. Artisans meticulously glue together various wood segments to create unique patterns and designs. This technique results in eye-catching pieces that highlight the natural beauty of the wood. Each piece requires careful planning and execution to achieve the desired visual effect.
The process not only showcases the artisan’s skill but also their ability to envision complex designs. Segmented woodturning offers endless possibilities, making it a favorite among woodworkers seeking to push the boundaries of traditional woodturning.
The Allure Of Segmented Woodturning
Segmented woodturning is an ancient art. It began many centuries ago. Early woodworkers used simple tools. They created beautiful, intricate patterns. These patterns were made from small pieces of wood. Artisans loved the flexibility it offered. Over time, techniques evolved. Modern tools made the process easier. Today, segmented woodturning is a popular hobby. It combines traditional skills with modern tools. The results are stunning and unique.
Woodturners enjoy creating segmented pieces. It allows them to be very creative. They can use different types of wood. Each type of wood has unique colors and textures. This variety adds beauty to their work. The process also requires precision. Woodturners must carefully measure and cut each piece. This makes the craft challenging and rewarding. Finished pieces are often admired by many people. They are both functional and decorative.
Essential Tools And Materials
Using the best wood is key. Hardwoods like maple and oak work well. Softwoods like pine are easy to turn. Each type of wood has its unique grain patterns. Exotic woods add beautiful colors. Always check the wood for knots and cracks. These can make turning hard. Choose wood that is dry and stable. This helps to avoid warping. Proper wood selection makes your project shine.
A lathe is the main tool. It spins the wood. Chisels are used to shape the wood. Calipers help measure thickness. Sandpaper smooths the surface. Glue holds segments together. Safety gear is important. This includes gloves and goggles. A face shield protects your face. Clamps hold the wood steady. A saw cuts the wood into pieces. Rulers and pencils help with marking. Sharpening tools keep your chisels sharp. Dust masks protect your lungs.
Design Fundamentals
Segmented woodturning involves combining pieces of wood. Each piece is called a segment. Patterns emerge from how these segments are arranged. Forms refer to the overall shape of the piece. Both patterns and forms are key to the beauty of segmented woodturning.
Geometry plays a huge role in segmentation. Shapes like circles, triangles, and squares are common. Precise angles ensure segments fit together well. This creates smooth and appealing designs. Symmetry is also very important. It helps in achieving balance and harmony in the piece.

Credit: www.popularwoodworking.com
Preparing Your Wood Segments
Use a sharp saw for precise cuts. Measure each piece carefully. Mark the wood clearly before cutting. Align the wood properly on the saw. Ensure the saw blade is at the right angle. Cut slowly to avoid mistakes. Check each piece for accuracy after cutting. Adjust if needed before moving on.
Apply glue evenly to both surfaces. Use clamps to hold pieces together. Ensure the pieces are aligned. Wipe off excess glue quickly. Let the glue dry completely. Check for gaps after drying. Fill any gaps with extra glue. Sand the surface smooth after filling gaps.
Basic Segmented Patterns
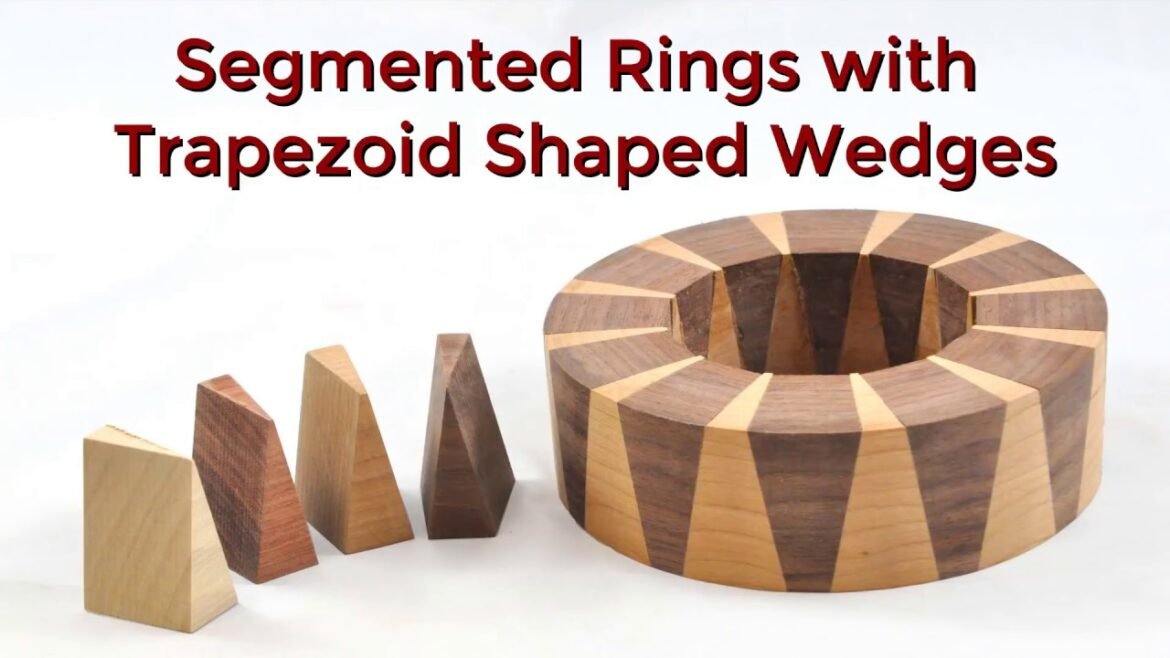
Simple rings are a great start for beginners. Cut small wood pieces into equal sizes. Glue the pieces into a circle. Press the pieces together tightly. Let the glue dry completely. Sand the ring until smooth. Repeat the process to create more rings. Stack the rings to form a pattern. Ensure each ring aligns perfectly. This method creates a beautiful base for your projects.
Checkerboard designs look stunning and complex. Alternate light and dark wood pieces. Arrange them in a checkerboard pattern. Glue the pieces together firmly. Ensure each piece fits snugly. Let the glue dry thoroughly. Sand the surface until smooth. The contrast between the woods is striking. These designs add a unique touch to any project.

Credit: segmentedturning.org
Advanced Segmented Patterns
Creating complex geometric designs in segmented woodturning takes skill. Each piece must fit perfectly. The shapes can be stars, diamonds, or hexagons. Accuracy is key for these designs. Many woodturners use jigs and templates. This helps ensure each cut is precise. Complex patterns are often more beautiful. They can also be more challenging. Patience and practice are important.
Using color and contrast can make segmented woodturning stand out. Different wood types have unique colors. Maple is light, while walnut is dark. Combining these creates stunning effects. Dyes and stains can also add color. High contrast patterns catch the eye. They make each piece unique. Experimenting with colors can be fun. It adds a new dimension to your work.
Assembly And Turning Techniques
Start by cutting segments of equal size. Precision is key here. Arrange the segments in a circular pattern. Glue them together to form rings. Use a press to ensure the rings are flat. Stack these rings on a lathe. Align them carefully for perfect symmetry. Use clamps to hold them in place. Let the glue dry completely before turning.
Begin with a sharp chisel. Slow and steady wins the race. Keep the lathe speed low to avoid errors. Sand between turning stages for a smooth finish. Apply finish to protect the wood. Patience is important in this process. Always wear safety gear when turning. Inspect your work regularly for flaws. Fix any issues before moving on.
Finishing Segmented Woodturning Projects
Start with coarse sandpaper to remove rough spots. Move to finer grit for a smoother surface. Keep the wood turning on the lathe for even sanding. Check for any uneven areas and smooth them out. Use a soft cloth to wipe off dust.
Choose a finish that enhances the wood’s natural beauty. Use a brush or cloth to apply the finish evenly. Let the first coat dry completely. Sand lightly between coats for a smooth result. Apply multiple coats for better protection and shine.
Innovative Ideas And Inspiration
Creating new patterns in segmented woodturning is exciting. Artists use bold colors and unique shapes. Some mix different types of wood. This creates stunning contrasts.
Woodturners often experiment with angles. They try geometric designs. Circles, triangles, and squares are popular. These shapes make the piece look more dynamic.
Master woodturners have made amazing pieces. Look at John Smith’s vase. It has intricate patterns. Each segment fits perfectly. Another great artist, Jane Doe, uses bright colors. Her bowls are very eye-catching.
Alex Brown combines wood and metal. This adds a modern touch. His pieces are very popular. These artists inspire many people. Their work shows the endless possibilities in segmented woodturning.
Tips For Overcoming Common Challenges
Master segmented woodturning patterns by starting with simpler designs and gradually increasing complexity. Ensure precision with accurate measurements and proper tool maintenance.
Troubleshooting Segmentation Problems
Glue can make segments slip. Use clamps to keep them in place. Gaps between segments look bad. Sand edges to fit tightly. Misaligned pieces can ruin the design. Measure twice before cutting.
Avoiding Common Mistakes
Choose wood with similar grain and color. Uneven thickness makes turning hard. Use a caliper to measure each piece. Poor glue joints can break. Press pieces together firmly. Rushing leads to errors. Take your time for the best results.
Learning And Community
Workshops offer hands-on experience. Teachers guide each step. Classes often provide tools and materials. Learning in a group builds confidence. Joining a class can spark new ideas. Many classes are available for all skill levels. Beginners and experts can learn together. Classes also offer safety tips. Hands-on practice helps retain skills. Workshops often end with a finished piece. This brings a sense of achievement.
Online forums connect woodturners worldwide. Members share tips and advice. Forums often have project galleries. These show off finished works. Many forums offer step-by-step guides. Videos are also common. Watching videos can simplify complex techniques. Online resources often include tool reviews. This helps in choosing the right equipment. Forums also discuss wood types. Understanding wood properties is crucial. Many resources are free to access. This makes learning affordable.
Transforming Woodturning Into Art
Segmented woodturning combines skill and imagination. Each piece is a unique work of art. Artists carefully select and join wood pieces. Patterns and designs are planned with precision. This process requires patience and a steady hand. The result is a stunning, intricate woodwork. These pieces showcase the artist’s talent and vision. Segmented woodturning turns ordinary wood into extraordinary creations. Every project tells a story through its patterns and colors.
Displaying your woodturning art attracts buyers. Use well-lit areas to showcase your work. Highlight the unique features of each piece. Create a portfolio to present your collection. Social media can help reach a wider audience. Join local craft fairs to meet potential buyers. Offer custom orders for personalized designs. Pricing should reflect the time and skill invested. Always ensure your work is of high quality. Happy customers will spread the word.

Credit: www.packardwoodworks.com
Frequently Asked Questions
What Angle Do You Cut A Segmented Bowl?
To cut a segmented bowl, use a 15-degree angle for 12 segments. Adjust angles based on the number of segments.
What Is The Golden Ratio In Woodturning?
The golden ratio in woodturning is a design principle. It suggests the most visually pleasing proportion, approximately 1. 618 to 1. This ratio helps create balanced and aesthetically appealing woodturning pieces. It is often used to determine the best dimensions for bowls, vases, and other turned items.
How Do You Make A Segmented Wood Vase?
To make a segmented wood vase, cut wood into segments, glue them into rings, stack and glue the rings, then turn on a lathe. Finish by sanding and applying a wood finish.
What Is The Best Wood For Spindle Turning?
Hardwoods like maple, cherry, and walnut are ideal for spindle turning. They offer smooth finishes and durability.
Conclusion
Mastering segmented woodturning patterns can elevate your woodworking skills. It offers unique and intricate designs. Practice and patience are key. Experiment with different techniques and materials to find your style. Keep turning and let your creativity flow. Enjoy the process and watch your craftsmanship improve.
Happy turning!
